Monday, November 24, 2014

Taiwan - a nation with a stark contrast of unprecedented modernity and pristine villages (all within just a few hundred kilometers)

Taiwan is a special country with regard to its ultra modern and opulent high tech cities like Taipei or Taichung with their high speed trains whilst at the same time having a very pristine and original village culture. And you get to see this stark contrast all within a journey spanning not more than 2 hours. And that makes it even more special as well as convenient. Taipei is the 15th most popular tourist destination in the world, just 1 place behind nothing other than Rome!! Its a country with a sparse population of just over 24 million, but there is just as much as different types of food you can taste in there!

The night markets in Taipei and Taichung are simply awesome (except for the huge crowd so much that your cell phone may not touch the ground if you drop it!), cheap and you don't have to bargain at all. Most items are within 100-150 NTD. There is a common misconception by foreigners that bargaining is like a mandatory practice in night markets, but not in Taiwan. Here are some shots of the Fengchia night market in Taichung city. I felt like this is the largest night market in Taiwan (not the ones in Taipei).


Huge crowd in Fengchia Night Market on a Friday market


Opera @ Taichung City


Sun Moon Lake and the surroundings are nature's boon to Taiwan. It is so beautiful and the bicycle journey through the side of the lakes and nearby small forests will be a very different experience to any traveler.  It is situated in Yuchi township in Nantou County, the only landlocked county of Taiwan. Home to Thao aboriginal tribes, I can see that much care has been taken to maintain the originality of the pristine village culture albeit you will encounter thousands of tourists (most of them from mainland China). The boat trip across the lake is very cheap and there are multiple small hills where you can go in boat and eat the popular Emu eggs, takes resplendent shots and maybe even meditate for hours! The boat trip is just about 300 NTD (about Rs. 600). There is also a ropeway and many shops which sell authentic Taiwanese souvenirs. Here are some shots.


The Lake


My Ticket


Wednesday, October 15, 2014

Coordinate and colour channel differences between OpenCV and VTK

When you are working with computer vision projects, you will probably have to encounter both OpenCV and VTK. To compare these two with regard to how their image coordinates are oriented is very important.

OpenCV image pixel coordinates are numbered  (x,y) from top left and x denotes columns and y denotes rows. Hence for a 1280*720 (width * height) image, (0,0) will be at top left. Top right will be (1280,0) and bottom right corner will be (1280,720).

VTK uses entirely different image coordinate system. Here a pixel coordinate (0,0) is at bottom left. The x denotes columns and y denotes rows. Hence bottom right will be (1280,0), top left will be (0,720) and top right will be (1280,720). So to convert an image properly from VTK to OpenCV you have to flip it vertically.

cv::flip(vtkImage, OpenCVimage, 0)
Click here for cv::flip Documentation 

The flag 0 is for flipping the image vertically to switch between top left and bottom left image origin.
The arguments vtkImage and OpenCVimage are cv::Mat types with vtkImage being the source and OpenCVimage being the output.   vtkImage in cv::Mat format is made using windowToImageFilter class in VTK.
Another big difference is the the default colour channel coding in OpenCV is in BGR format whilst it is RGB in VTK.
These two differences should always be kept in mind while working with images. Usually you have an image rendered by VTK and then you have to process it by OpenCV. This is possible by using the windowToImageFilter class in VTK. Using this, vtkImage in cv::Mat format can be made. I have written a small program which shows how these differences affect when you convert VTK image to OpenCV image. Click here for the Github repository link


Tuesday, August 26, 2014

InstantFFT - A small application to view the fourier image of any images

This is my first attempt in developing a small image processing app which will convert any color input images (jpeg or png) into their corresponding fourier transform images. This could be useful for beginners who are reading/studying about 2D fourier transform so that they can see how exactly a fourier image looks like.


Click here to download the app

Double click the 'instantFFT.exe' file and then click 'Load Image'. Browse and open any images of your choice (jpeg or png) and the corresponding fourier image will be displayed on the right side together with the source image on the left side. I have converted the fourier image to RGB format (normally fourier images are grayscale images with float  (decimal) values), but you will get the general idea by seeing the pattern in the RGB fourier image too

Tuesday, June 24, 2014

How to set up Qt with VTK in Visual Studio 2010 Professional SP1 (Microsoft Windows 8 32 bit)


Setting up the software environment for your project is probably the cruelest procedures during your entire programming venture. Qt and VTK integration in Visual Studio is useful for many computer vision applications like virtual reality, augmented reality, etc. If you are comfortable with linux, then the procedures are a bit more solid and less prone to runtime errors. Yet, Windows is still used by many for their projects which includes me. This tutorial will show how to install Qt and VTK in your Windows and also integrating both of them. After this, you are free to do your coding in Visual Studio.

Important: The Qt add-in plugin will only work with Visual Studio Professional editions and not with the free Express editions. My version is Microsoft Visual Studio 2010 Professional. Before you move with the compiling and building, I noticed that 2010 Professional has got some issues with Qt-VTK integration. These issues were solved when I installed Microsoft Visual Studio 2010 SP1 update. Install this by clicking here.

Resources Required:
  1. Qt binary file: Do not download the latest Qt5 versions. It has got so many bugs and you will be simply wasting your time. Download Qt4 versions. The version I use is Qt v4.8.3. Click here to download the binary
  2. Qt Visual Studio 2010 add in (v1.1.11) binary: Link
  3. VTK source file: The version I use is VTK v5.10.1. Download Link
  4. CMake binary file: My version CMake 2.8. Download Link
  5. PathEditor: For adding and editing system variable paths. Download Link. Ofcourse you can do it without PathEditor by right clicking "My Computer"---Advanced System Settings---Environment Variables. In the "Environment Variables" window, you can add paths of required folders in "System Variables" under the "Variable" field named "Path". A semi-colon is required before adding a new path. PathEditor makes all this very easy and it enables to see the existing paths clearly with ease.

Okay, now you are ready to proceed.  Like I mentioned, this is assuming you already have installed Microsoft Visual Studio 2010 Professional with SP1 update. Installing Visual Studio is not discussed here.

Step 1: Install Qt by clicking "qt-win-opensource-4.8.3-vs2010.exe" file you downloaded. It will install to "C:\Qt\4.8.3". After this, open PathEditor and add "C:\Qt\4.8.3\bin" to the "System" in PathEditor by clicking "Add" and browsing to the aforementioned folder (without the quotes!). You should add the "bin" folder and not its parent "4.8.3" folder.

Step 2: Open Visual Studio 2010 Command Prompt (2010). This is located in "Microsoft Visual Studio 2010 Tools" folder ("C:\ProgramData\Microsoft\Windows\Start Menu\Programs\Microsoft Visual Studio 2010\Visual Studio Tools"). Navigate to the Qt folder where you installed Qt. This is done by  typing the following in the command prompt window that you just opened:

cd C:\Qt\4.8.3 

Press enter and the cmd will navigate to the Qt folder. Then type:

configure -platform win32-msvc2010 -opensource  

Press Enter. Type 'o' when asked for which version to install and then type 'y' to accept the license. It will start configuring and may take some time. In my system (Intel i3, 16 GB RAM) it took about 20 minutes. So be patient.

After configuration, if you didn't receive any errors, all is good. Now you can start building. For this, type in cmd:

nmake  

Press Enter and it will start buiding. Beware! This will take hell lot of time. In my system, it took about 3 hours. It can be even more. Maybe like 5 hours! So do something else and keep looking often in the cmd window if there are any errors. After everything is over, you can close the window.

Step 3: Next step is to add Qt add-in plugin for Visual Studio 2010 Professional. Just click the binary file you downloaded ("qt-vs-addin-1.1.11-opensource.exe") and install it. After the installation, you can see a Qt plugin in your visual studio. Close everything. You have successfully installed Qt4!

Step 4: Open CMake. CMake is a handy tool for making makefiles. The VTK source files that you have in the zip folder "vtk-5.10.1.zip" needs to be converted to makefiles so that Visual Studio can work with them. Extract the zip to "C:\VTK". After extraction rename the folder inside the parent VTK folder to "VTK-src". Now the source files will be located in "C:\VTK\VTK-src". Add two empty folders "VTK-build" ("C:\VTK\VTK-build") and also "VTK-install" ("C:\VTK\VTK-install") In the CMake, click "Browse Source" and navigate to "C:\VTK\VTK-src" folder. The binaries has to be built it "C:\VTK\VTK-build" folder. So "Browse Build" and give "C:\VTK\VTK-build". Click "Configure" button in CMake. Choose Visual Studio 2010 and default native compilers in the next popping up window and then proceed. Configuring may take a few minutes.

After configuring, you need to edit the CMAKE_INSTALL_PREFIX path to "C:\VTK\VTK-install" folder. Check BUILD_SHARED_LIBS and VTK_USE_QT. Also, check the "Advanced" checkbox and then a few more options will be visible to you. In that, check VTK_USE_GUISUPPORT too. This is very important! If you don't do this, you will have to reconfigure the entire damn thing!

Click 'Configure' again. If there are errors, google the error that shows up in CMake window. You may get lucky. If all the steps were infallible, then "Generate". You have successfully built the binaries for VTK using CMake! 

Step 4: Browse to "C:\VTK\VTK-build" folder and there will be a "VTK.sln" file which you should double click and it will open up the whole project in Visual Studio 2010 Professional. Great. Now the most important thing you should compile it in "RELEASE" mode and not in the default "Debug" mode. So change it to "Release". 
After this, look in the Solution Explorer pane in Visual Studio. There will be "ALL_BUILD". Right click it and click "Build". It will take some time. Maybe 30-40 minutes to compile. So be patient. After this is done, find out "INSTALL" in the Solution Explorer pane and do the same procedure (Right click and then "Build"). VTK will be installed to your "C:\VTK\VTK-install" folder. 

After all these, it will be nice to add "C"\VTK\VTK-buil

That's it. You are all set up with Qt and VTK.


Friday, April 11, 2014

How to batch process the zscores of weight and height from raw weight and height data of children in an MS Excel file using Epi Info?

Very few options exist for researchers working with the anthropometric scores of children to batch process the weight and height data into weight for age or height for age z scores. One of them is Epi Info. However, a naive user may find working with Epi Info absolutely tiresome, inefficient and clueless. I believe this is due to two main reasons. Firstly, the support for Epi Info is not very good (phConnect is a good platform for help, but the odds are that you may never find any clues to your snags). Secondly, Epi Info itself is very obstinate about its semantics and the data types and is bereft of flexibility. However, it may still be one of the best options for storing data and analysis.

Many a times your dataset will be an MS Excel file. Suppose you want to calculate the weight for age z score for a group children whose weight and age is available in your dataset. Ofcourse, if the sample size is not that large, manual computation is more than fine. But when it gets to higher sizes, things go nasty.

Convert age into age in months and then use that variable (for example, say, AgeMonths) for calculating zscores. This you can do in MS Excel itself.
Weight should be in kilograms and gender of children should be coded as 1 and 2 (1 for boys and 2 for girls).
All these three variables, Weight, AgeMonths and Gender should be of  NUMERIC. It will usually be of type 'General' in Excel. So to convert from General to NUMERIC,  select the columns of these three variables and select 'Number' from the drop down menu within the HOME button of MS Excel. (Fig 1)
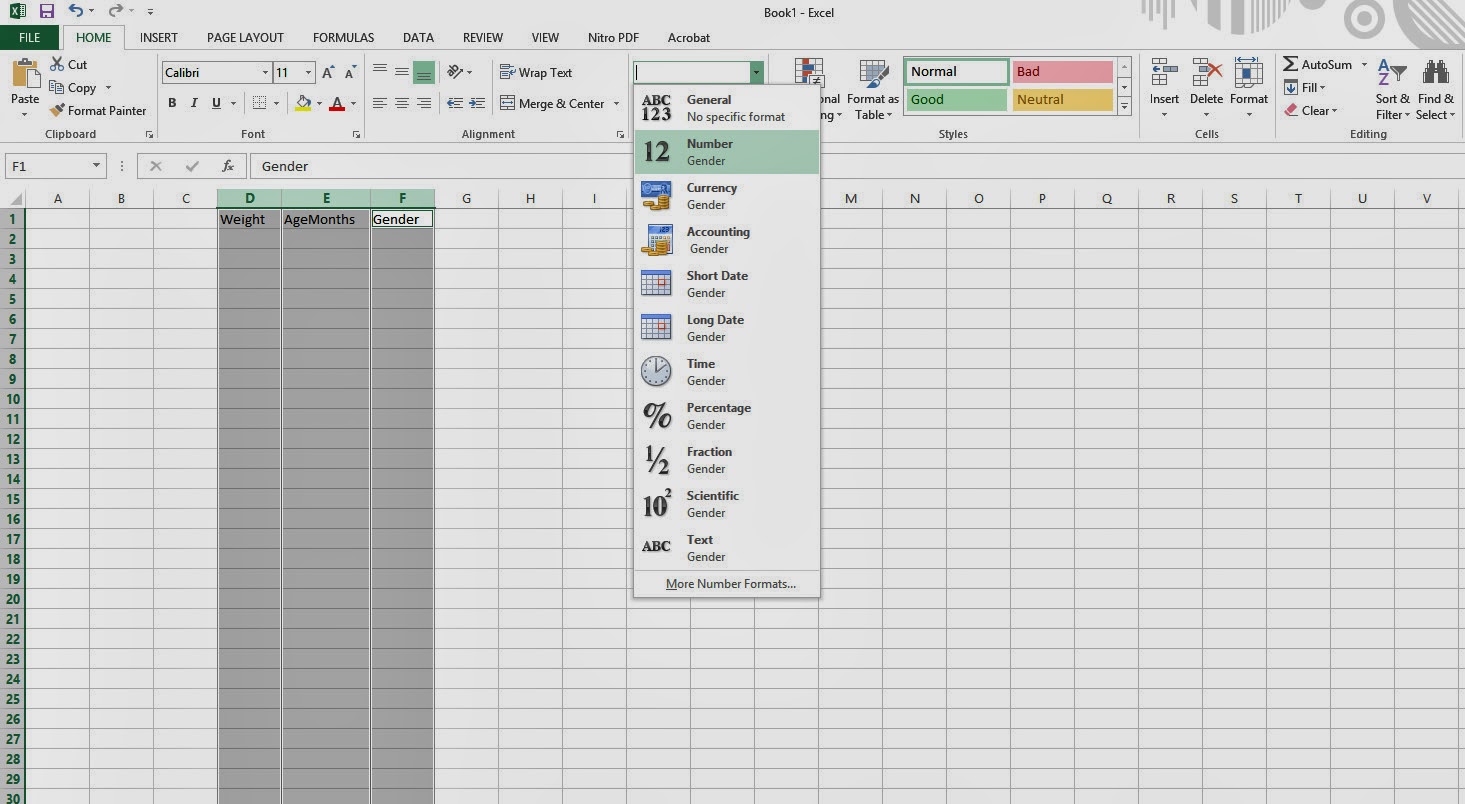
Figure 1

Next thing would be to inspect blank cells in all the three variables and replace them with some really big or really small number. This is important as Epi Info absolutely despises blank values and you will be stuck with really weird error messages. Suppose if you replace them with a really big number like 10000 for Weight, then after calculating zscores you will be able to see a really big zscore value which makes no sense in any planet and can easily remove them manually.
Epi Info likes .xls files than .xlsx or .csv (at least I felt so). So save the workbook as a .xls file.
The pre-processing part is now complete.

Next step would be to import this .xls file into Epi Info. Open Epi Info and then click: Classic --> Read. In the database type, choose  MS Excel 97-2003 workbook (.xls) option. Then in Data Source, choose the .xls file that you have previously saved.

Give it some time. In the Data Source Explorer window, a dataframe name will come. Click it and then click OK. (Figure 2)
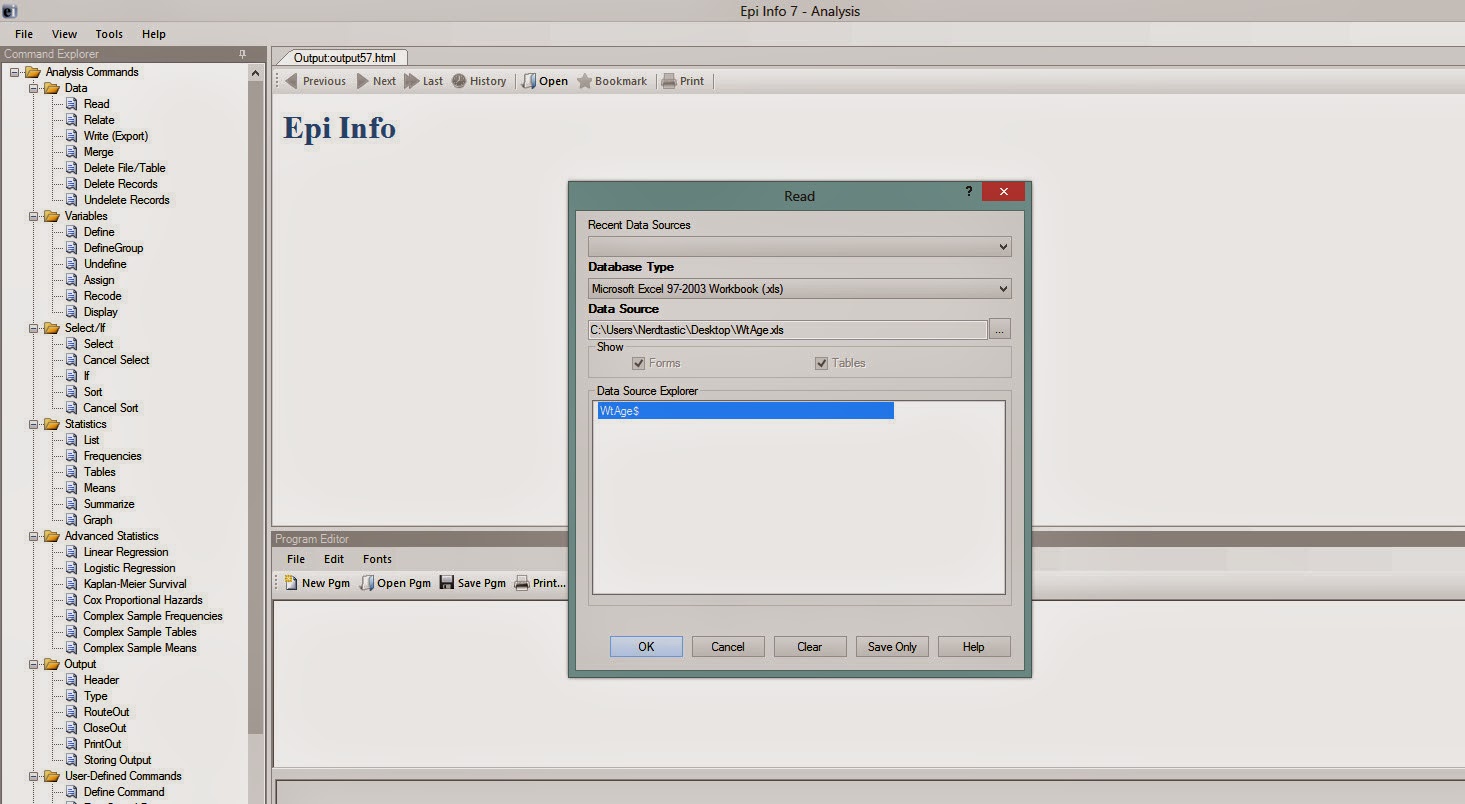
Figure 2


After you click OK, wait for a few seconds and if you have done it correctly, something like this would happen (Figure 3)
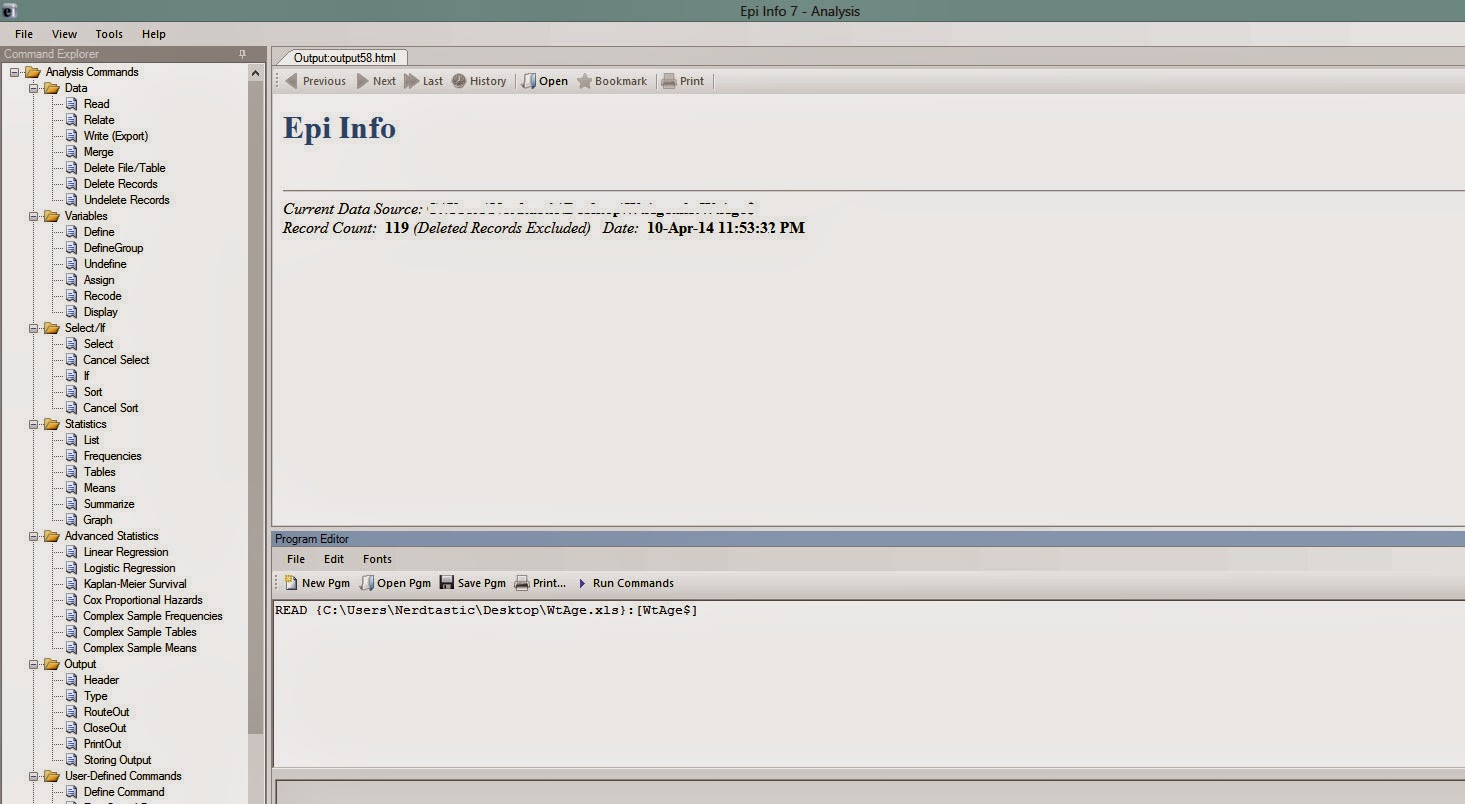
Figure 3

Now you have to create a variable (for example, say, WtAgeZscore) which will contain the weight for age z scores of the children in your dataset. This can be done by writing the command DEFINE WtAgeZscore NUMERIC in the program editor and clicking 'Run Commands' (Figure 4)
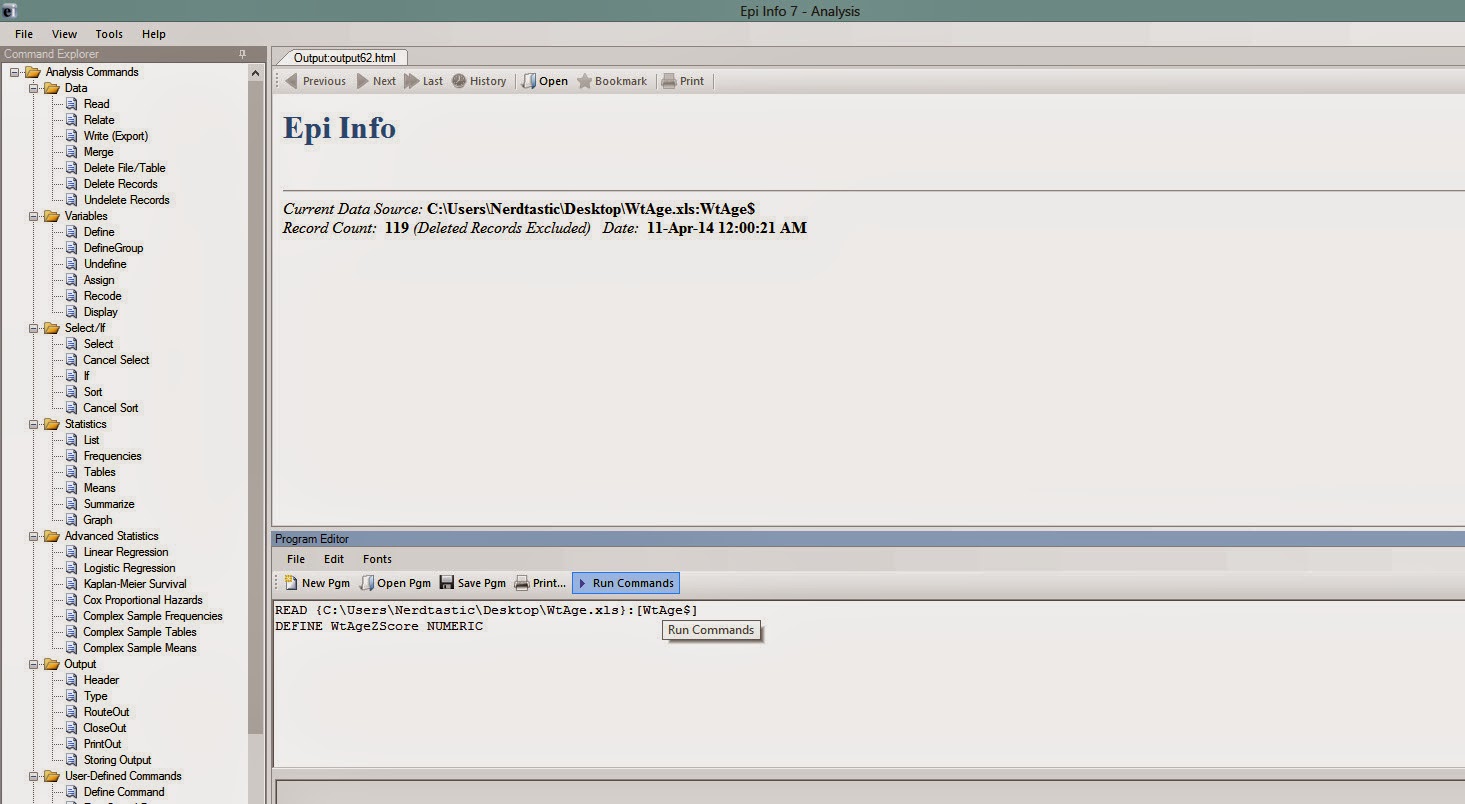
Figure 4

Now you are ready to generate weight for age z scores.
Please go through the official documentation from CDC.

If you are using CDC 2000 standards, then the command should be (see Figure 5)

ASSIGN WtAgeZscore = ZSCORE("CDC 2000", "WtAge", Weight, AgeMonths, Gender)

After writing the command, click 'Run Commands'
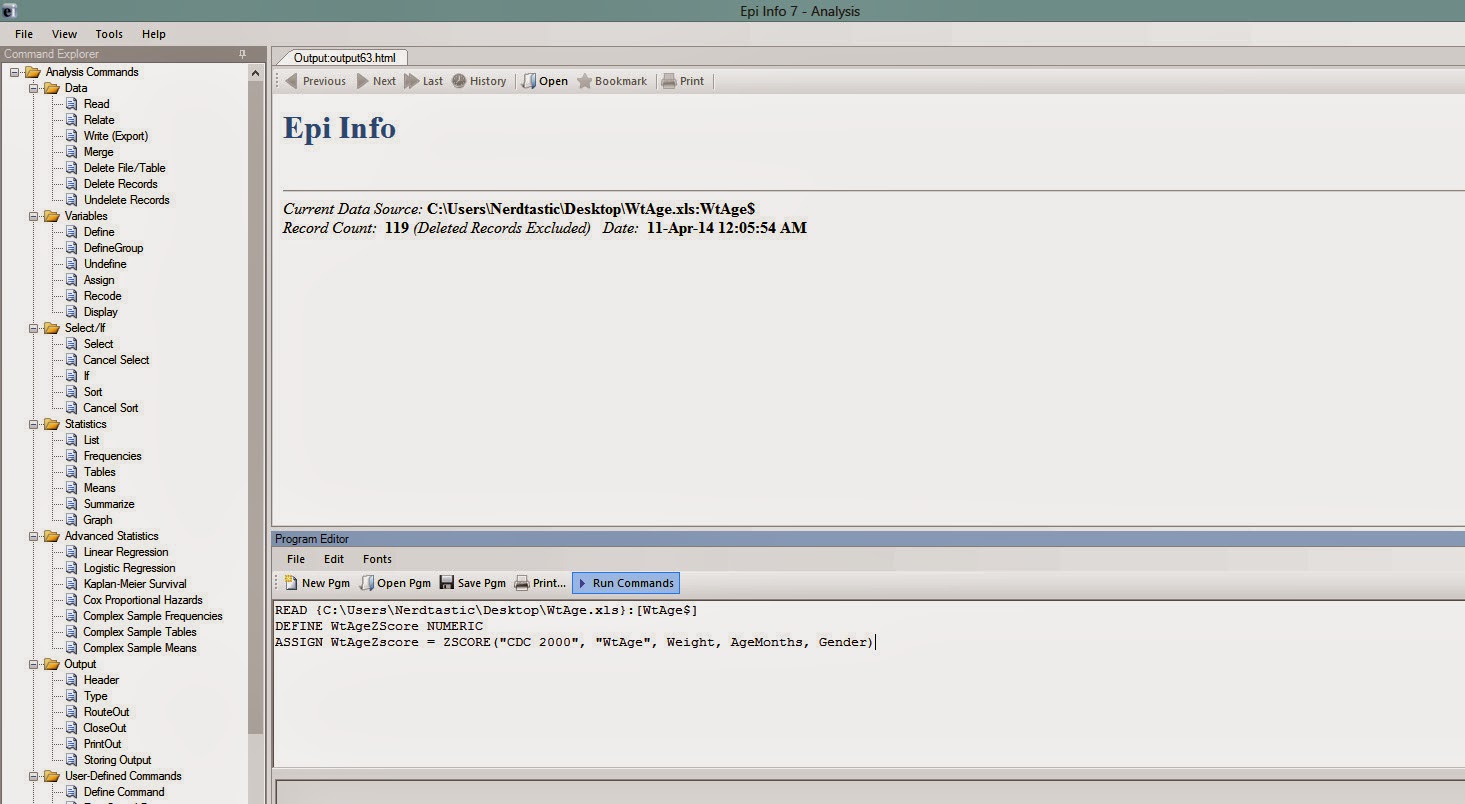
Figure 5
That's it. You have generated weight for age z scores in your dataset.
Next step would be to EXPORT this dataset with the WtAgeZscore variable. This can be done by clicking 'Write(Export)' in the left vertical pane of Epi Info. You have to have an already existing .xls file so that you can give it as the 'Connection Information' and a new sheet name ('wtagezscore' in this example) as the 'Destination Table' (see Figure 6).
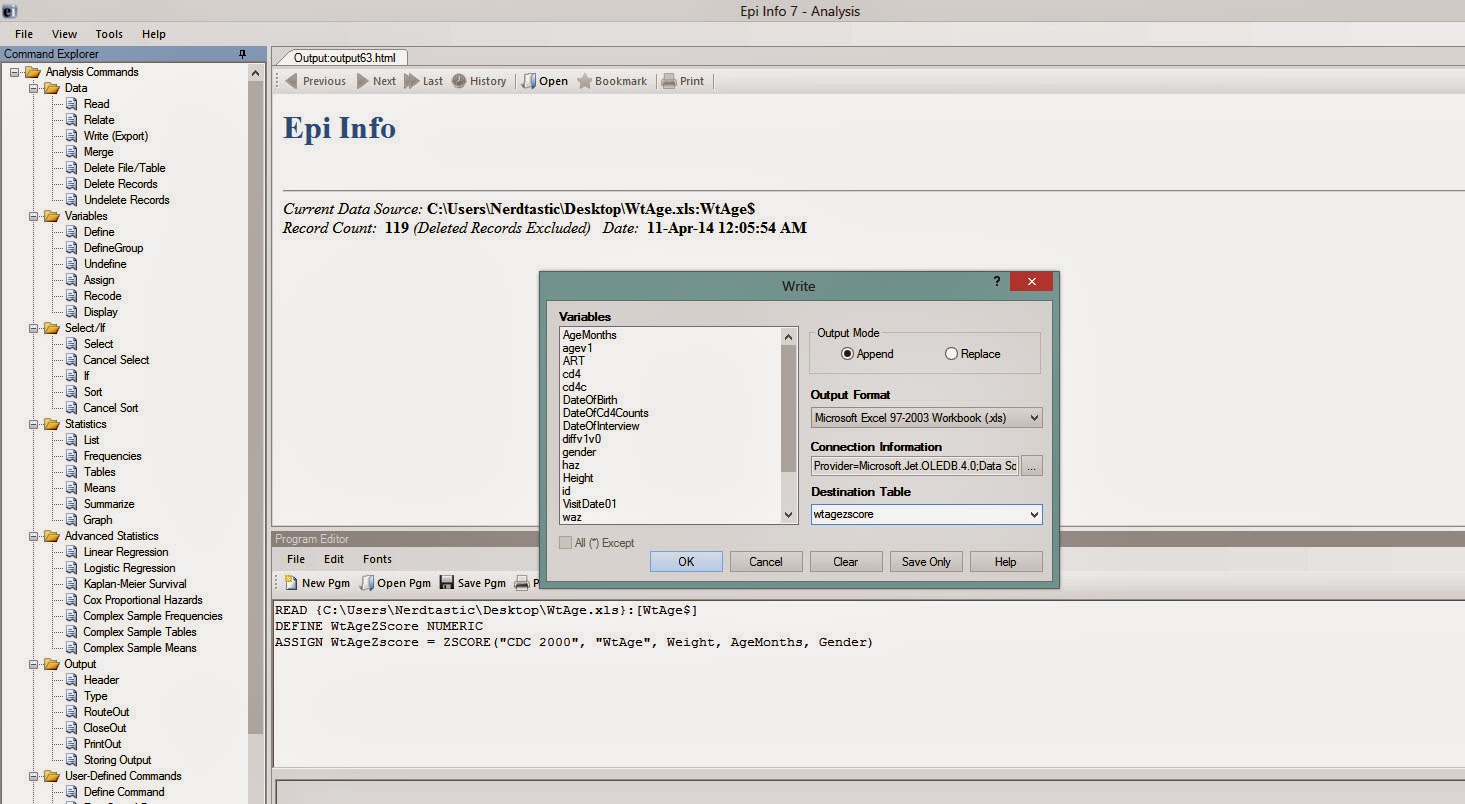
Figure 6
If everything goes fine, your Epi Info should look like this:
Figure 7


 That's it. You have a new dataset now with all the weight for age z scores of children according to CDC 2000 charts. Do not forget to find the weird values (the values corresponding to blank cells which we manipulated) and remove them so that you can work with your dataset.